1/28/2011
Linux basic command: Network based IDS - Snort
Linux basic command: Network based IDS - Snort: "[1] Install and configure Snort [root@www ~]# wget http://www.snort.org/dl/binaries/linux/snort-2.8.2.1-1.RH5.i386.rpm [root@www ~]# rpm -U..."
1/27/2011
Network based IDS - Snort
[1] Install and configure Snort
[root@www ~]# wget http://www.snort.org/dl/binaries/linux/snort-2.8.2.1-1.RH5.i386.rpm
[root@www ~]# rpm -Uvh snort-2.8.2.1-1.RH5.i386.rpm
Preparing...############################ [100%]
1:snort############################ [100%]
[root@www ~]# vi /etc/snort/snort.conf
# line 46: change to LAN
var HOME_NET 192.168.0.0/24
# line 49: change
var EXTERNAL_NET !$HOME_NET
[root@www ~]# vi /etc/logrotate.d/snort
# line 4: change
/var/log/snort/alert /var/log/snort/*log {
[2] Register from here for free in order to get snort rule files. After registration, download "snortrules-snapshot-CURRENT.tar.gz" and upload it on your server.
[3] Install the file that is uploaded on [2] and start Snort.
[root@www ~]# tar zxvf snortrules-snapshot-CURRENT.tar.gz
[root@www ~]# cp -r rules/* /etc/snort/rules/
[root@www ~]# rm -rf doc etc rules so_rules
[root@www ~]# /etc/rc.d/init.d/snortd start
Starting snort: [ OK ]
[root@www ~]# chkconfig snortd on
[4] Install SnortSnarf in order to watch logs of Snort from Web browser.
[root@www ~]# yum --enablerepo=dag install perl-Time-module
[root@www ~]# wget http://www.snort.org/dl/contrib/data_analysis/snortsnarf/SnortSnarf-050314.1.tar.gz
[root@www ~]# tar zxvf SnortSnarf-050314.1.tar.gz
[root@www ~]# mkdir /usr/local/bin/snortsnarf
[root@www ~]# cp SnortSnarf-050314.1/snortsnarf.pl /usr/local/bin/snortsnarf/
[root@www ~]# cp -r SnortSnarf-050314.1/include /usr/local/bin/snortsnarf/
[root@www ~]# vi /usr/local/bin/snortsnarf/include/SnortSnarf/HTMLMemStorage.pm
# line 290: change (remove '->')
return @arr[($first-1)..$end];
[root@www ~]# vi /usr/local/bin/snortsnarf/include/SnortSnarf/HTMLAnomMemStorage.pm
# line 266: change (remove '->')
return @arr[($first-1)..$end];
[root@www ~]# vi /etc/httpd/conf.d/snort.conf
Alias /snort /var/www/snort
Order deny,allow
Deny from all
# IP address you allow
Allow from 127.0.0.1 192.168.0
[root@www ~]# /etc/rc.d/init.d/httpd restart
Stopping httpd: [ OK ]
Starting httpd: [ OK ]
[root@www ~]# vi snortsnarf.sh# create init script
#!/bin/bash
cd /usr/local/snortsnarf
if [ -s /var/log/snort/alert ]; then
if [ -s /var/log/snort/portscan.log ]; then
./snortsnarf.pl -dns -d /var/www/snort /var/log/snort/alert /var/log/snort/portscan.log
else
./snortsnarf.pl -dns -d /var/www/snort /var/log/snort/alert
fi
fi
[root@www ~]# chmod 700 snortsnarf.sh
[root@www ~]# ./snortsnarf.sh# run
[root@www ~]# crontab -e
*/10 * * * * /root/snortsnarf.sh# run every 10 minutes
[5] Access to the page you set with web browser, then SnortSnarf start page is shown and you can watch the logs of Snort.
 [6] Try to portscan with nmap from your another Host to your Snort Server and verify Snort logs.

[7] Install Oinkmaster in order to update rule files automatically. A code is necessarry for it, Login and push "Get Code" in the site and remember it.
[root@www ~]# wget http://jaist.dl.sourceforge.net/sourceforge/oinkmaster/oinkmaster-2.0.tar.gz 
[root@www ~]# tar zxvf oinkmaster-2.0.tar.gz
[root@www ~]# cp oinkmaster-2.0/oinkmaster.pl /usr/local/bin/
[root@www ~]# cp oinkmaster-2.0/oinkmaster.conf /etc/
[root@www ~]# rm -rf oinkmaster-2.0
[root@www ~]# vi /etc/oinkmaster.conf
# line 55: change code you got
url = http://www.snort.org/pub-bin/oinkmaster.cgi/(your code)/snortrules-snapshot-CURRENT.tar.gz
[root@www ~]# oinkmaster.pl -o /etc/snort/rules/ # run
Loading /etc/oinkmaster.conf
Downloading file from http://www.snort.org/pub-bin/oinkmaster.cgi/*oinkcode*/snortrules-snapshot-CURRENT.tar.gz... done.
Archive successfully downloaded, unpacking... done.
Setting up rules structures...
WARNING: duplicate SID in your local rules, SID 3017 exists multiple times, you may need to fix this manually!
done.
Processing downloaded rules... disabled 0, enabled 0, modified 0, total=12183
Setting up rules structures...
WARNING: duplicate SID in your local rules, SID 3017 exists multiple times, you may need to fix this manually!
done.
Comparing new files to the old ones... done.
[***] Results from Oinkmaster started 20080621 23:56:39 [***]
[*] Rules modifications: [*]
None.
[*] Non-rule line modifications: [*]
None.
[*] Added files: [*]
None.
[root@www ~]# vi oinkmaster.sh# create init script
#!/bin/sh
/usr/bin/oinkmaster.pl -o /etc/snort/rules/ 2>&1 | logger -t oinkmaster
/etc/rc.d/init.d/snortd restart > /dev/null
[root@www ~]# chmod 700 oinkmaster.sh
[root@www ~]# ./oinkmaster.sh# run
[root@www ~]# crontab -e
0 1 * * * /root/oinkmaster.sh# run every 1:00 AM
[root@www ~]# wget http://www.snort.org/dl/binaries/linux/snort-2.8.2.1-1.RH5.i386.rpm
[root@www ~]# rpm -Uvh snort-2.8.2.1-1.RH5.i386.rpm
Preparing...############################ [100%]
1:snort############################ [100%]
[root@www ~]# vi /etc/snort/snort.conf
# line 46: change to LAN
var HOME_NET 192.168.0.0/24
# line 49: change
var EXTERNAL_NET !$HOME_NET
[root@www ~]# vi /etc/logrotate.d/snort
# line 4: change
/var/log/snort/alert /var/log/snort/*log {
[2] Register from here for free in order to get snort rule files. After registration, download "snortrules-snapshot-CURRENT.tar.gz" and upload it on your server.
[3] Install the file that is uploaded on [2] and start Snort.
[root@www ~]# tar zxvf snortrules-snapshot-CURRENT.tar.gz
[root@www ~]# cp -r rules/* /etc/snort/rules/
[root@www ~]# rm -rf doc etc rules so_rules
[root@www ~]# /etc/rc.d/init.d/snortd start
Starting snort: [ OK ]
[root@www ~]# chkconfig snortd on
[4] Install SnortSnarf in order to watch logs of Snort from Web browser.
[root@www ~]# yum --enablerepo=dag install perl-Time-module
[root@www ~]# wget http://www.snort.org/dl/contrib/data_analysis/snortsnarf/SnortSnarf-050314.1.tar.gz
[root@www ~]# tar zxvf SnortSnarf-050314.1.tar.gz
[root@www ~]# mkdir /usr/local/bin/snortsnarf
[root@www ~]# cp SnortSnarf-050314.1/snortsnarf.pl /usr/local/bin/snortsnarf/
[root@www ~]# cp -r SnortSnarf-050314.1/include /usr/local/bin/snortsnarf/
[root@www ~]# vi /usr/local/bin/snortsnarf/include/SnortSnarf/HTMLMemStorage.pm
# line 290: change (remove '->')
return @arr[($first-1)..$end];
[root@www ~]# vi /usr/local/bin/snortsnarf/include/SnortSnarf/HTMLAnomMemStorage.pm
# line 266: change (remove '->')
return @arr[($first-1)..$end];
[root@www ~]# vi /etc/httpd/conf.d/snort.conf
Alias /snort /var/www/snort
Order deny,allow
Deny from all
# IP address you allow
Allow from 127.0.0.1 192.168.0
[root@www ~]# /etc/rc.d/init.d/httpd restart
Stopping httpd: [ OK ]
Starting httpd: [ OK ]
[root@www ~]# vi snortsnarf.sh# create init script
#!/bin/bash
cd /usr/local/snortsnarf
if [ -s /var/log/snort/alert ]; then
if [ -s /var/log/snort/portscan.log ]; then
./snortsnarf.pl -dns -d /var/www/snort /var/log/snort/alert /var/log/snort/portscan.log
else
./snortsnarf.pl -dns -d /var/www/snort /var/log/snort/alert
fi
fi
[root@www ~]# chmod 700 snortsnarf.sh
[root@www ~]# ./snortsnarf.sh# run
[root@www ~]# crontab -e
*/10 * * * * /root/snortsnarf.sh# run every 10 minutes
[5] Access to the page you set with web browser, then SnortSnarf start page is shown and you can watch the logs of Snort.


[7] Install Oinkmaster in order to update rule files automatically. A code is necessarry for it, Login and push "Get Code" in the site and remember it.
[root@www ~]# wget http://jaist.dl.sourceforge.net/sourceforge/oinkmaster/oinkmaster-2.0.tar.gz 
[root@www ~]# tar zxvf oinkmaster-2.0.tar.gz
[root@www ~]# cp oinkmaster-2.0/oinkmaster.pl /usr/local/bin/
[root@www ~]# cp oinkmaster-2.0/oinkmaster.conf /etc/
[root@www ~]# rm -rf oinkmaster-2.0
[root@www ~]# vi /etc/oinkmaster.conf
# line 55: change code you got
url = http://www.snort.org/pub-bin/oinkmaster.cgi/(your code)/snortrules-snapshot-CURRENT.tar.gz
[root@www ~]# oinkmaster.pl -o /etc/snort/rules/ # run
Loading /etc/oinkmaster.conf
Downloading file from http://www.snort.org/pub-bin/oinkmaster.cgi/*oinkcode*/snortrules-snapshot-CURRENT.tar.gz... done.
Archive successfully downloaded, unpacking... done.
Setting up rules structures...
WARNING: duplicate SID in your local rules, SID 3017 exists multiple times, you may need to fix this manually!
done.
Processing downloaded rules... disabled 0, enabled 0, modified 0, total=12183
Setting up rules structures...
WARNING: duplicate SID in your local rules, SID 3017 exists multiple times, you may need to fix this manually!
done.
Comparing new files to the old ones... done.
[***] Results from Oinkmaster started 20080621 23:56:39 [***]
[*] Rules modifications: [*]
None.
[*] Non-rule line modifications: [*]
None.
[*] Added files: [*]
None.
[root@www ~]# vi oinkmaster.sh# create init script
#!/bin/sh
/usr/bin/oinkmaster.pl -o /etc/snort/rules/ 2>&1 | logger -t oinkmaster
/etc/rc.d/init.d/snortd restart > /dev/null
[root@www ~]# chmod 700 oinkmaster.sh
[root@www ~]# ./oinkmaster.sh# run
[root@www ~]# crontab -e
0 1 * * * /root/oinkmaster.sh# run every 1:00 AM
1/26/2011
Linux basic command: Installing ISPCP Omega 1.0.7 On Ubuntu 10.10
Linux basic command: Installing ISPCP Omega 1.0.7 On Ubuntu 10.10: "'ispCP Omega (to simplify matters often called only ispCP) is a modern hosting Control panel, based on VHCS, that provides continued develop..."
1/25/2011
Installing ISPCP Omega 1.0.7 On Ubuntu 10.10
"ispCP Omega (to simplify matters often called only ispCP) is a modern hosting Control panel, based on VHCS, that provides continued development." http://isp-control.net/
This tutorial is a slighlty modified version of the official installation instructions found at http://isp-control.net/documentation/start/installation/ubuntu
You will need a clean installation of Ubuntu 10.10 before proceeding with the tutorial, please follow the instructions on the first two pages at http://www.howtoforge.com/perfect-server-ubuntu-10.10-maverick-meerkat-ispconfig-2
1. Download and extract ISPCP from Sorceforge
cd /usr/local/src
wget http://sourceforge.net/projects/ispcp/files/ispCP%20Omega/ispCP%20Omega%201.0.7/ispcp-omega-1.0.7.tar.bz2/download
tar xjvf ispcp-omega-1.0.7.tar.bz2
cd ispcp-omega-1.0.7
2. Now update your system
aptitude update && aptitude upgrade
3. ISPCP needs some software installed, we will do this now
ISPCP's install script is for Ubuntu 10.04 but works just aswell with 10.10
cd docs/Ubuntu
aptitude install $(cat ubuntu-packages-lucid)
You will be asked to enter a new MySql password
You will also need to configure Courier as below
Create web directories -> NO
Type of mail configuration -> Internet Site
System mail name should be populated with your hostname
ProFTPd configuration -> Standalone
4. Build the system using make
cd /usr/local/src/ispcp-omega-1.0.7
make -f Makefile.ubuntu install
5. Copy all the directories to your system and setup
cp -Rv /tmp/ispcp/* /
cd /var/www/ispcp/engine/setup
perl ispcp-setup
The setup defaults should be adequate, you will be required to enter your MySQL password.
6. Clean temporary files
rm -fR /tmp/ispcp
After setup completes you should be able to login to your new control panel.
1/21/2011
Network settings
[1] Change to static IP addres if you use Ubuntu 10.04 as a server.
root@ubuntu:~# vi /etc/network/interfaces
# This file describes the network interfaces available on your system
# and how to activate them. For more information, see interfaces(5)..
# The loopback network interface
auto lo
iface lo inet loopback
# The primary network interface
auto eth0
# make it comment
#iface eth0 inet dhcp
# add these lines
iface eth0 inet static
address 10.0.0.50# define IP address
network 10.0.0.0# define network address
netmask 255.255.255.0# define subnet mask
broadcast 10.0.0.255# define broadcast address
gateway 10.0.0.1# define default gateway
dlp:~# /etc/init.d/networking restart
* Reconfiguring network interfaces...
[2] Disable IPv& if not needed.
root@ubuntu:~# echo "net.ipv6.conf.all.disable_ipv6=1" >> /etc/sysctl.conf
root@ubuntu:~# reboot
root@ubuntu:~# ifconfig
eth0Link encap:Ethernet HWaddr 00:22:68:3d:82:88
inet addr:10.0.0.50 Bcast:10.0.0.255 Mask:255.255.255.0
UP BROADCAST RUNNING MULTICAST MTU:1500 Metric:1
RX packets:50 errors:0 dropped:0 overruns:0 frame:0
TX packets:46 errors:0 dropped:0 overruns:0 carrier:0
collisions:0 txqueuelen:1000
RX bytes:5813 (5.8 KB) TX bytes:7450 (7.4 KB)
Interrupt:27 Base address:0x8000
loLink encap:Local Loopback
inet addr:127.0.0.1 Mask:255.0.0.0
UP LOOPBACK RUNNING MTU:16436 Metric:1
RX packets:0 errors:0 dropped:0 overruns:0 frame:0
TX packets:0 errors:0 dropped:0 overruns:0 carrier:0
collisions:0 txqueuelen:0
RX bytes:0 (0.0 B) TX bytes:0 (0.0 B)
From(server-world).
1/18/2011
Install firefox 4.0 beta using ubuntu PPA
Firefox 4 Beta (version 1) considered to be stable and safe to use for daily web browsing, though the features and content may change before the final product release. At this time many Add-ons may not yet have been tested by their authors to ensure that they are compatible with this release.
What is new in firefox beta1 from here
What is new in firefox beta1 from here
Install firefox 4.0 beta in Ubuntu 10.10/10.04/9.10
Open the terminal and run the following commands:
sudo add-apt-repository ppa:ubuntu-mozilla-daily/ppa
sudo apt-get update
sudo apt-get install firefox-4.0
1/17/2011
Enable root user on ubuntu
The root user in Ubuntu is disabled by default because password is not set. But if you'd like to use root user by some reason, enable it.
[1] Set root password
lucid@ubuntu:~$ sudo passwd root
Enter new UNIX password:# set root password
Retype new UNIX password:# verify
passwd: password updated successfully
lucid@ubuntu:~$ su -
Password:# root password
root@ubuntu:~## just switched to root
* The examples on this site show as a root user from now. If you use sudo, add "sudo" at the head of commands.
[2] If you enable roo, limit users to switch to root.
root@ubuntu:~# vi /etc/pam.d/su
# line 15: uncomment and add a group that can switch to root
auth required pam_wheel.so group=adm
root@ubuntu:~# vi /etc/group
# line 5: add users you allow to switch to root
adm:x:4:lucid
From (server-world)
Add a user in ubuntu 10.04
[1] If you'd like to add new user, Do like follows.
lucid@ubuntu:~$ sudo adduser ubuntu # add a user "ubuntu"
Adding user `ubuntu' ...
Adding new group `ubuntu' (1000) ...
Adding new user `ubuntu' (1000) with group `ubuntu' ...
Creating home directory `/home/ubuntu' ...
Copying files from `/etc/skel' ...
Enter new UNIX password:
Retype new UNIX password:
passwd: password updated successfully
Changing the user information for ubuntu
Enter the new value, or press ENTER for the default
Full Name []:# if not needed, Enter with empty
Room Number []:
Work Phone []:
Home Phone []:
Other []:
Is the information correct? [Y/n] y
lucid@ubuntu:~$
[2] If you'd like to give a privileges to a new user, Do like follows.
lucid@ubuntu:~$ sudo vi /etc/group
# near line 50: add in admin group
admin:x:111:lucid,ubuntu
lucid@ubuntu:~$ su - ubuntu
Password:
To run a command as administrator (user "root"), use "sudo <command>".
See "man sudo_root" for details.
ubuntu@ubuntu:~$ sudo reboot # try to execute
[sudo] password for ubuntu:# input own password
ubuntu@ubuntu:~$
Broadcast message from lucid@ubuntu
(/dev/pts/0) at 2:28 ...
The system is going down for reboot NOW! # success
1/13/2011
Linux command list
mkdir - make directories
Usage
mkdir [OPTION] DIRECTORY
Options
Create the DIRECTORY(ies), if they do not already exist.
Mandatory arguments to long options are mandatory for short options too.
-m, mode=MODE set permission mode (as in chmod), not rwxrwxrwx - umask
-p, parents no error if existing, make parent directories as needed
-v, verbose print a message for each created directory
-help display this help and exit
-version output version information and exit
cd - change directories
Use cd to change directories. Type cd followed by the name of a directory to access that directory.Keep in mind that you are always in a directory and can navigate to directories hierarchically above or below.
mv- change the name of a directory
Type mv followed by the current name of a directory and the new name of the directory.
Ex: mv testdir newnamedir
pwd - print working directory
will show you the full path to the directory you are currently in. This is very handy to use, especially when performing some of the other commands on this page
rmdir - Remove an existing directory
rm -r
Removes directories and files within the directories recursively.
chown - change file owner and group
Usage
chown [OPTION] OWNER[:[GROUP]] FILE
chown [OPTION] :GROUP FILE
chown [OPTION] --reference=RFILE FILE
Options
Change the owner and/or group of each FILE to OWNER and/or GROUP. With --reference, change the owner and group of each FILE to those of RFILE.
-c, changes like verbose but report only when a change is made
-dereference affect the referent of each symbolic link, rather than the symbolic link itself
-h, no-dereference affect each symbolic link instead of any referenced file (useful only on systems that can change the ownership of a symlink)
-from=CURRENT_OWNER:CURRENT_GROUP
change the owner and/or group of each file only if its current owner and/or group match those specified here. Either may be omitted, in which case a match is not required for the omitted attribute.
-no-preserve-root do not treat `/' specially (the default)
-preserve-root fail to operate recursively on `/'
-f, -silent, -quiet suppress most error messages
-reference=RFILE use RFILE's owner and group rather than the specifying OWNER:GROUP values
-R, -recursive operate on files and directories recursively
-v, -verbose output a diagnostic for every file processed
The following options modify how a hierarchy is traversed when the -R option is also specified. If more than one is specified, only the final one takes effect.
-H if a command line argument is a symbolic link to a directory, traverse it
-L traverse every symbolic link to a directory encountered
-P do not traverse any symbolic links (default)
chmod - change file access permissions
Usage
chmod [-r] permissions filenames
r Change the permission on files that are in the subdirectories of the directory that you are currently in. permission Specifies the rights that are being granted. Below is the different rights that you can grant in an alpha numeric format.filenames File or directory that you are associating the rights with Permissions
u - User who owns the file.
g - Group that owns the file.
o - Other.
a - All.
r - Read the file.
w - Write or edit the file.
x - Execute or run the file as a program.
Numeric Permissions:
CHMOD can also to attributed by using Numeric Permissions:
400 read by owner
040 read by group
004 read by anybody (other)
200 write by owner
020 write by group
002 write by anybody
100 execute by owner
010 execute by group
001 execute by anybody
ls - Short listing of directory contents
-a list hidden files
-d list the name of the current directory
-F show directories with a trailing '/'
executable files with a trailing '*'
-g show group ownership of file in long listing
-i print the inode number of each file
-l long listing giving details about files and directories
-R list all subdirectories encountered
-t sort by time modified instead of name
cp - Copy files
cp myfile yourfile
Copy the files "myfile" to the file "yourfile" in the current working directory. This command will create the file "yourfile" if it doesn't exist. It will normally overwrite it without warning if it exists.
cp -i myfile yourfile
With the "-i" option, if the file "yourfile" exists, you will be prompted before it is overwritten.
cp -i /data/myfile
Copy the file "/data/myfile" to the current working directory and name it "myfile". Prompt before overwriting the file.
cp -dpr srcdir destdir
Copy all files from the directory "srcdir" to the directory "destdir" preserving links (-poption), file attributes (-p option), and copy recursively (-r option). With these options, a directory and all it contents can be copied to another dir
ln - Creates a symbolic link to a file.
ln -s test symlink
Creates a symbolic link named symlink that points to the file test Typing "ls -i test symlink" will show the two files are different with different inodes. Typing "ls -l test symlink" will show that symlink points to the file test.
locate - A fast database driven file locator.
slocate -u
This command builds the slocate database. It will take several minutes to complete this command.This command must be used before searching for files, however cron runs this command periodically on most systems.locate whereis Lists all files whose names contain the string "whereis". directory.
more - Allows file contents or piped output to be sent to the screen one page at a time
less - Opposite of the more command
cat - Sends file contents to standard output. This is a way to list the contents of short files to the screen. It works well with piping.
whereis - Report all known instances of a command
wc - Print byte, word, and line counts
bg
bg jobs Places the current job (or, by using the alternative form, the specified jobs) in the background, suspending its execution so that a new user prompt appears immediately. Use the jobs command to discover the identities of background jobs.
cal month year - Prints a calendar for the specified month of the specified year.
cat files - Prints the contents of the specified files.
clear - Clears the terminal screen.
cmp file1 file2 - Compares two files, reporting all discrepancies. Similar to the diff command, though the output format differs.
diff file1 file2 - Compares two files, reporting all discrepancies. Similar to the cmp command, though the output format differs.
dmesg - Prints the messages resulting from the most recent system boot.
fg
fg jobs - Brings the current job (or the specified jobs) to the foreground.
file files - Determines and prints a description of the type of each specified file.
find path -name pattern -print
Searches the specified path for files with names matching the specified pattern (usually enclosed in single quotes) and prints their names. The find command has many other arguments and functions; see the online documentation.
finger users - Prints descriptions of the specified users.
free - Displays the amount of used and free system memory.
ftp hostname
Opens an FTP connection to the specified host, allowing files to be transferred. The FTP program provides subcommands for accomplishing file transfers; see the online documentation.
head files - Prints the first several lines of each specified file.
ispell files - Checks the spelling of the contents of the specified files.
kill process_ids
kill - signal process_ids
kill -l
Kills the specified processes, sends the specified processes the specified signal (given as a number or name), or prints a list of available signals.
killall program
killall - signal program
Kills all processes that are instances of the specified program or sends the specified signal to all processes that are instances of the specified program.
mail - Launches a simple mail client that permits sending and receiving email messages.
man title
man section title - Prints the specified man page.
ping host - Sends an echo request via TCP/IP to the specified host. A response confirms that the host is operational.
reboot - Reboots the system (requires root privileges).
shutdown minutes
shutdown -r minutes
Shuts down the system after the specified number of minutes elapses (requires root privileges). The -r option causes the system to be rebooted once it has shut down.
sleep time - Causes the command interpreter to pause for the specified number of seconds.
sort files - Sorts the specified files. The command has many useful arguments; see the online documentation.
split file - Splits a file into several smaller files. The command has many arguments; see the online documentation
sync - Completes all pending input/output operations (requires root privileges).
telnet host - Opens a login session on the specified host.
top - Prints a display of system processes that's continually updated until the user presses the q key.
traceroute host - Uses echo requests to determine and print a network path to the host.
uptime - Prints the system uptime.
w - Prints the current system users.
wall - Prints a message to each user except those who've disabled message reception. Type Ctrl-D to end the message.
1/10/2011
Linux CentOS 5 On VMWare Server: Installing VMWare Tools
A few weeks ago I’ve made a few posts on installing Linux CentOS 5 on a VMware Server. Well today I realized I didn’t post the part about installing the VMware Tools. These tools allow you to increase your virtual machine’s performance and capabilities.
Prior to installing the VMware Tools, there are a few things you want to do. The first step would be to install the kernel header files and a C compiler:
# yum install gcc gcc-c++ kernel-devel
The second thing would be to create a symbolic link pointing to your kernel header files:
# ln –s /usr/src/kernels/[your kernel version] /usr/src/linux
Now you’re ready to install the VMware Tools. From the VMware Server Console (with your virtual machine running), click on “VM => Install VMware Tools…”. Nothing is supposed to be happening at this point, it’s just like you inserted a virtual CD. From the command line, mount the cdrom drive, copy the installation files to a directory on your virtual hard drive and untar them:
# mount /dev/cdrom /mnt/cdrom
# cd /mnt/cdrom
# cp VMwareTools-[version].tar.gz /tmp
# cd /tmp
# umount /mnt/cdrom
# tar zxf VMwareTools-[version].tar.gz
Execute the VMware Tools installation script:
# cd /tmp/vmware-tools-distrib
# ./vmware-install.pl
Go through the installation and answer all the questions. I’ve left every settings to its default value.
When you’re done, simply reboot your virtual machine. I’ve had a little problem with X as it wouldn’t start upon reboot. I just used the X configuration wizard (which launched automatically) to make some adjustments, rebooted the VM again and everything worked fine.
1/06/2011
Install Ubuntu server 10.04 LTS
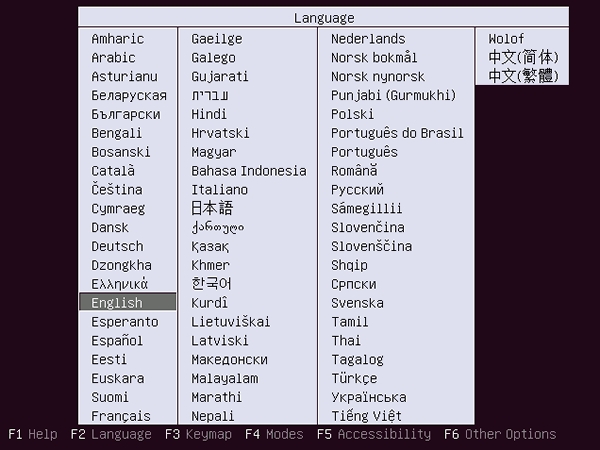
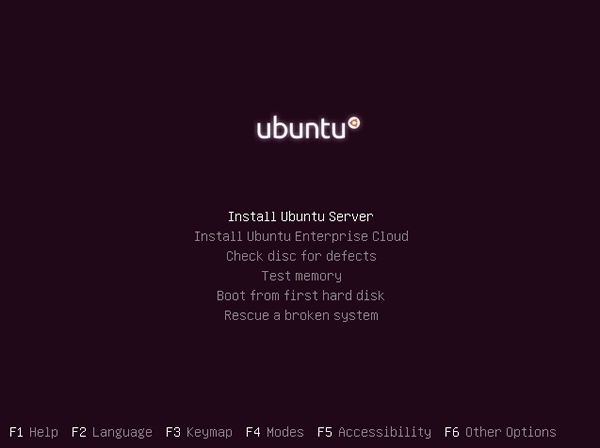
[1] Insert a disk for installation of Ubuntu 10.04 LTS and reboot your computer. The screen of selecting language. Choose it and go next. | |
 |
[2] | Push Enter |
 |
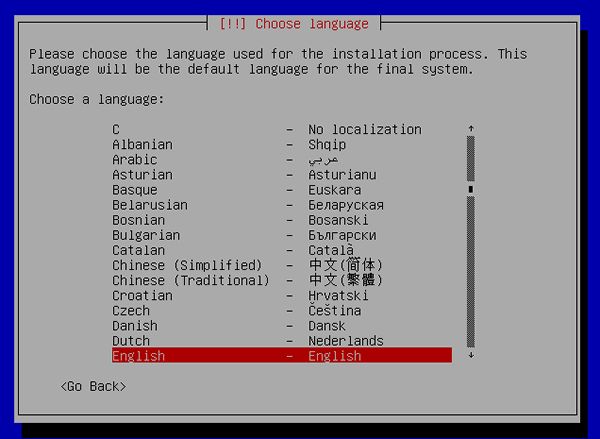
[3] | Select your language. |
 |
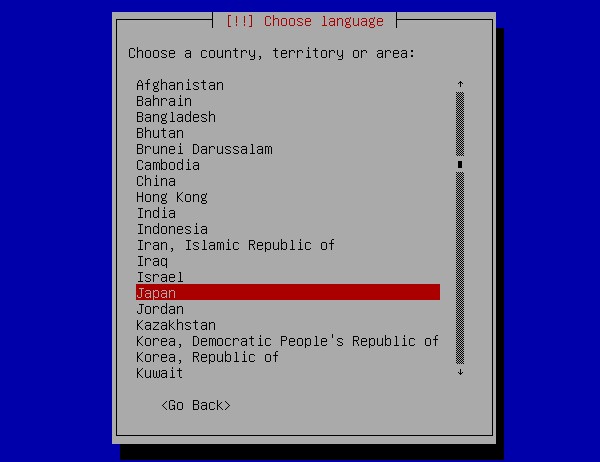
[4] | select your country. |
 |
[5] | Select "No" to configure manually keyboard layout. |
 |
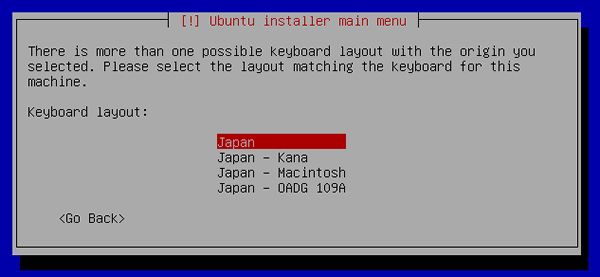
[6] | Select keyboard type. |
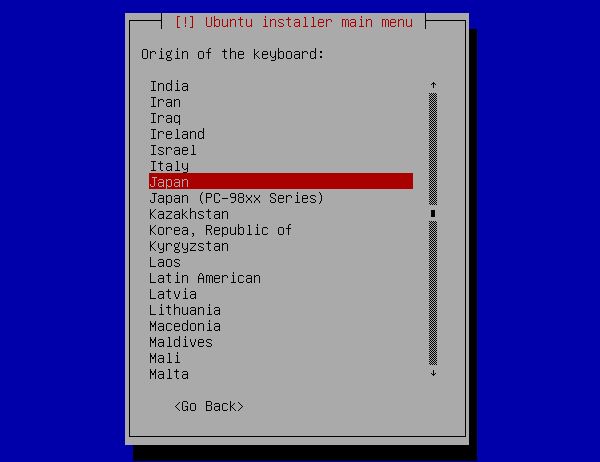 |
[7] | Select keyboard layout. |
 |
[8] | Specify any Hostname you like. |
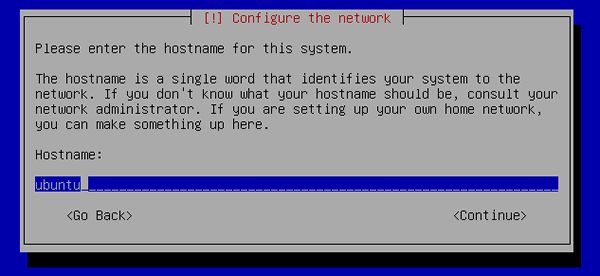 |
[9] | Select your time zone. |
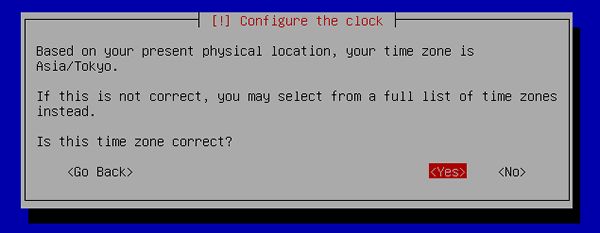 |
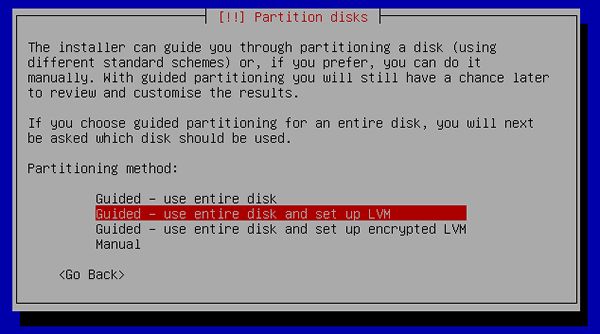
[10] | This is the section for configure partition. This example select "Guided". |
 |
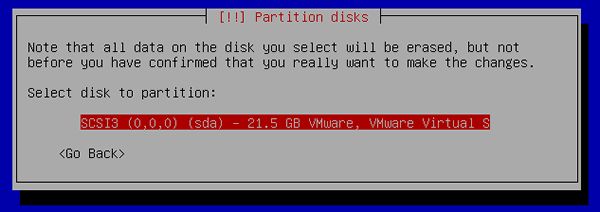
[11] | Select a disk to create partitions. |
 |
[12] | If existing partitions are detected, installer asks like below. If it's OK, answer "Yes". |
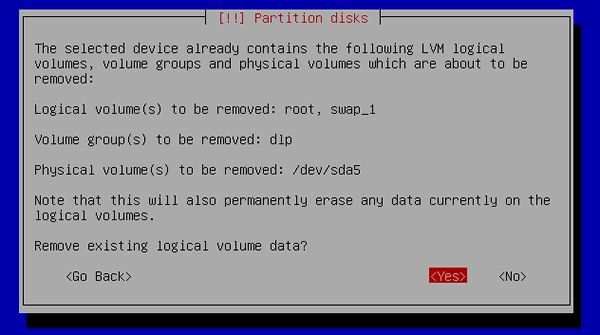 |
[13] | If it's OK, answer "Yes". |
 |
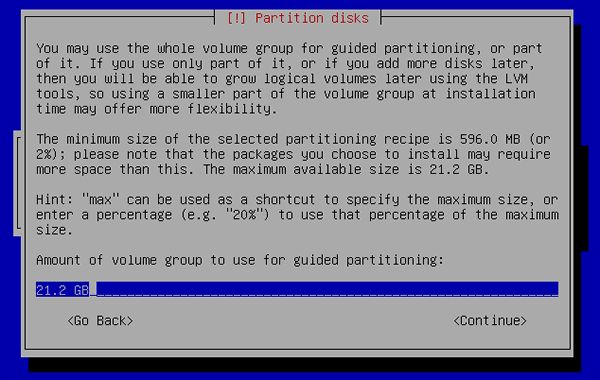
[14] | Enter the amount set LVM volume group assigned to. |
 |
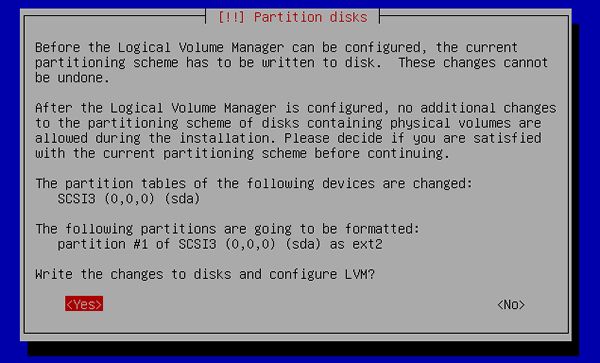
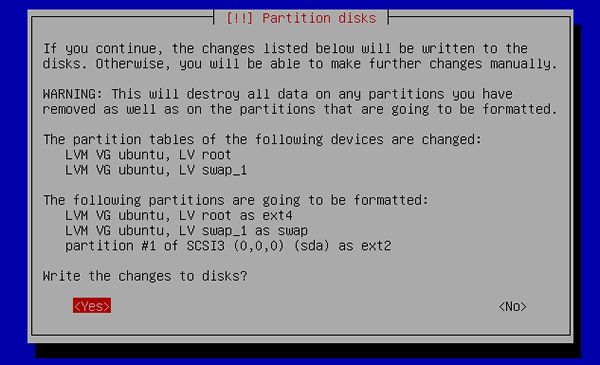
[15] | It's completed to configure partitions. If it's OK, answer "Yes". |
 |
[16] | Installation of base system proceeds. |
 |
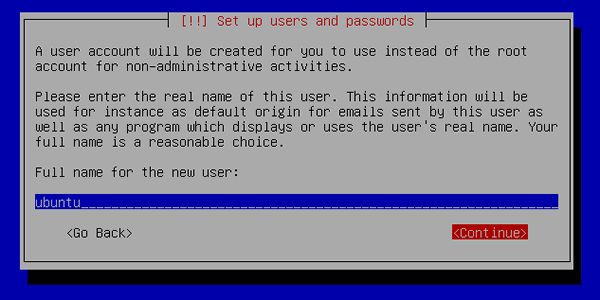
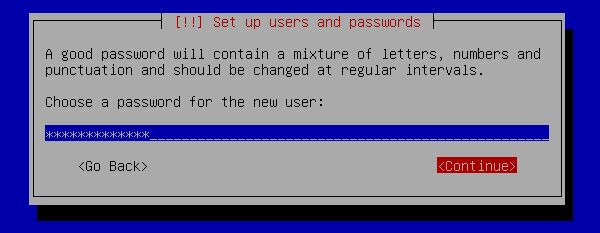
[17] | Set user account. The user set on here is administration user by default. |
 |
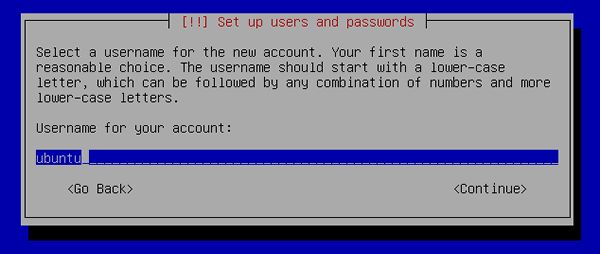
[18] | Input user name on the system. |
 |
[19] | Set password. |
 |
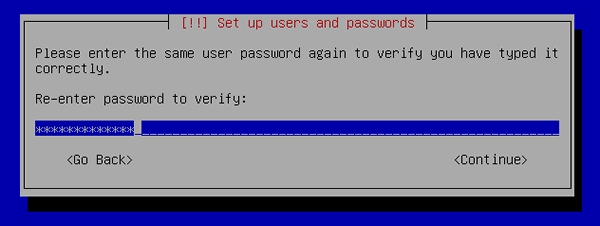
[20] | Verify password. |
 |
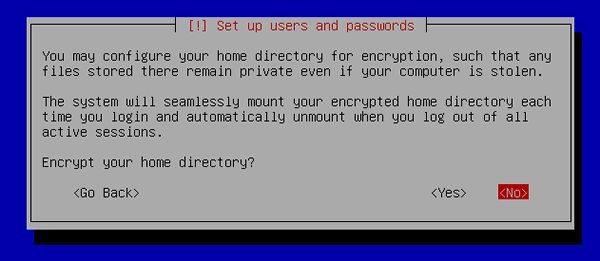
[21] | If you'd like to encrypt home directory, answer "Yes". |
 |
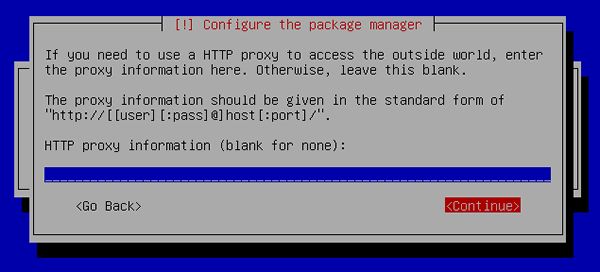
[22] | Set Proxy if you use it. If not, Continue with empty. |
 |
[23] Select if you set automatical update or not. automatical update is convenience but sometimes it causes troubles, so if you use this server as a Mission Critical Server, Don't use automatical update, it's better to update by manually after verification. | |
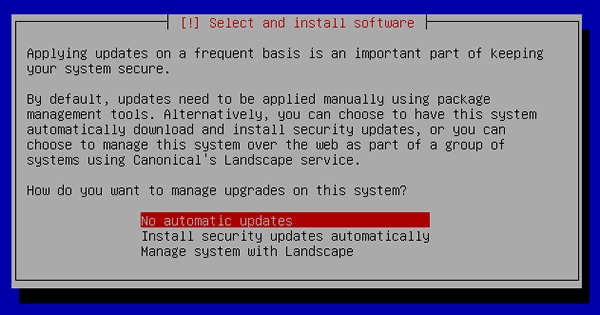 |
[24] Select softwares to install. Go next without checking boxes all, it's better to install something if needed. | |
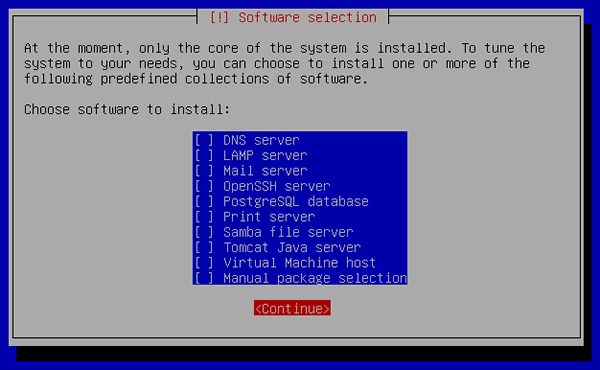 |
[25] | Answer "Yes" if Grub is installed on MBR. |
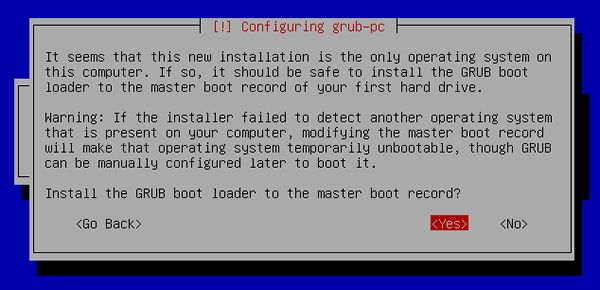 |
[26] Installation is completed. Remove the disk and Continue. Then system reboots. | |
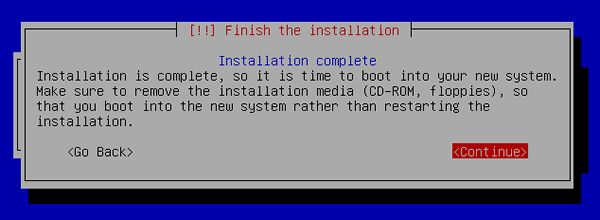 |
[27] The system boots and show login prompt like below. Login with a user set in installation. | |
Subscribe to:
Comments (Atom)